This tutorial is meant to be simple. At the end of this tutorial, you will have a working Slack slash command, but this is only meant to get you started making your own amazing slack application. In my example, the command will convert 2- and 3-digit country codes into the name of the country.
Anyway, let’s get started.
Make a Slack App
First, you’re going to need to sign in to your workspace. For this demo, I will be using my workspace niles-tanner.
Once you’ve signed into your workspace you will need to create a new application, add the slash command functionality, and click the Create a new command button.
Next, you will see this screen:
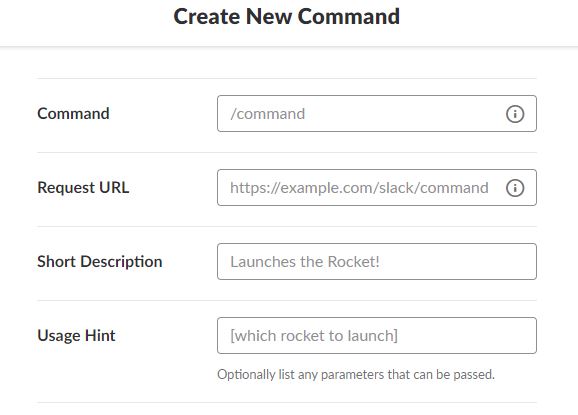
I named my command /countrylookup.
At this point, you might notice that you don’t have Request URL yet. This will end up being the NodeJS server’s POST URL. In the meantime, we can set up a request bin URL.
Set Up a Request Bin
Request bin can be a useful tool, in general, to test webhooks before you actually have a server in place to receive them.
All you have to do is create a new request bin and copy the Bin URL into the Request URL field of your new Slack command.
At this point, you can add your app to your workspace and try it out. The form payload should be sent to the request bin URL and you can see exactly what will be sent to your server!
Now that we have set up the slash command properly, we can move on to create the NodeJS service.
Building Your Server (Using NodeJS, Express)
The example source code can be found here
Start a new node project with:
1 | npm init |
Why are we using these packages?
express: It makes it easy for us to set up a route for the Slack command to consume.
body-parser: This middleware will make parsing the payload from the slash command much easier.
country-info-list: This is the library I am using to look up the country names from their alpha codes. These packages aren’t necessary to make every slash command; they are just being used for this demo.
Next let’s set up your index.js:
1 | const express = require('express'); |
In this tutorial I’m not going to go into the details of how to configure an express project. The main thing to point out here is how we are processing the text after the slack command. For example:
In Slack we type:1
/countrylookup US
In our application in the /country route:1
Const {text} = req.body; // text has the value of 'US'
Basically, whatever is after the slash command in Slack will be sent as form data under the attribute ‘text’.
Testing Your Application Locally
You should be able to get your app running by running:1
node index.js
Below are some options for testing your app once your up and running.
Method 1: Postman
One of my favorite tools for testing new endpoints is Postman. If you haven’t heard of it, I highly recommend the product as it makes API development a breeze.
Once you have your node-express server running locally you can try to hit your endpoint from Postman.
- Url: localhost:3000/country
- HTTP method: POST
- Body type: x-www-form-url-encoded (This is important!)
- Form data: Use the key ‘text’. The value will be whatever text you want your service to consume. In my case, I’m sending ‘US’.
When you’ve got it all set up, send off your request and it should look something like this:
Alternatively, you can take the form data that was captured by Request Bin and put it into Postman using the bulk edit option. This might be useful to test against the actual payload from Slack.
Method 2: ngrok
Ngrok allows us to convert our localhost URL into a public URL that can be accessed anywhere on the internet. Ok, so ngrok isn’t the only option here, but ngrok is my favorite and you can install it with npm.1
npm install -g ngrok
This is super useful because now we can edit our slack application and test out the local server with the actual slash command from Slack!
Once ngrok is installed and you have your local server running, you can expose your local server beyond just your local machine:1
Ngrok http 3000
This command takes your application running on port 3000 and provides a public URL.
Upload to Heroku
You can upload my example by clicking this button:
If you have your own application, it’s super easy to deploy with Heroku. I’m not going to rehash how to do this because Heroku has already provided great docs for deployment.
Once you get your app hosted, you can edit your Slack app and add your public URL.
Congrats—you’ve created a Slack slash command!
Sum Up
This was a pretty simple example. However, it covers a number of different technologies. Hopefully this tutorial gives you the tools that you need to create your fantastic Slack app—whether the app gives you random cat facts, automates your workflow, or becomes self-aware and tries to take over the world.